Monday 30 April 2012

Mini Flower Ball & Display Stand

Mini mock-kusudama ball & bell jar-shaped stand.
Here is the flower ball ornament mentioned in yesterday's post (Topiary Trees 29 April 2012). It is inspired by kusudama origami flowers - but it is much less labour-intensive to make! Use the 12-sided paper ball pattern provided yesterday. The ball is covered with Petal Pairs Center Perks flowers, how-tos given in my 25 Feb 2012 post (Flower Basket Card).

The hanging loop and tassel are made from craft thread. (You can use a purchased tassel, if preferred. Or, add a few threaded beads instead of the tassel - the purpose is to weight the flower ball.) To make a tassel, wrap the thread around a piece of card (15-20 wraps). Tie the top. cut across the bottom with sharp scissors. Spiral-wrap the tassel top with contrast craft thread, inserting the thread ends into the coil to anchor and conceal them. (You can Google-search how-to illustrations for tassel-making.)

Important: you must insert the hanging loop through the top hole and the tassel through the bottom hole before you assemble the halves of the ball! And you must also pierce or punch a hole through the centres of the top and bottom flowers before gluing them in place. Glue the top and bottom flowers in place before you insert the loop and tassel.

A few decorative gold beads have been added to the hanging loop. Tip: to thread the beads on to the loop, tie a piece of sewing thread on to the loop. Pass the sewing thread through the beads, pulling the thread loop with it. The slender thread easily passes through the beads, and all that is needed is a small tug to get the loop through the beads. Remove the sewing thread from the loop. Knot the loop above the beads.

Here's the template for the display stand:

The folded frame will fit inside a C5 envelope (162 x 229cm).
Cut 2 frames out of gold card. Fold as marked. Glue together at the top, edges matching. Punch a hole through both layers. The base interlocks to make the stand - just overlap the semi-circles and in the opposite direction to the side tabs. Thread the flower ball loop through the hole and knot on the back of the stand. 

The flower balls, on their own, can be used as tree ornaments. Choose jewel tones and metallics for a festive look.

Stuff I used: Tonic Studios Petal Pairs punches, Canford card, Frosted Gold (2 sheets A4), craft thread, 3 gold beads, Bazill Basics cardstock for the flower ball, assorted papers for the flowers, square foam sticky pads (inside the flower centres), PVA glue.

Sunday 29 April 2012

Topiary Trees


"Lollipop Trees" make fun party favours.


These topiary-look mini trees are fun to make - and much easier to craft than they look. The secret: a mock kusudama-origami flower ball. To make it, punched paper flowers are glued on to a paper ball. The flowers are made using
Tonic Studios Petal Pairs punches - both the original size and the slightly smaller Petal Pairs Petites.


 Here's how to assemble the flower ball:
The flower ball is a dodecahedron - a 12-sided shape, exactly the same as that used for a fabric patchwork ball. It looks a bit like a cartoon cracked egg. You match the points to assemble the halves of the egg. Two colours have been used in the photo for clarity. You can glue the tabs on the outside of the shape - they won't show when the flowers are glued on top. Make sure there is a hole punched in the bottom face of the ball - this will take the lollipop stick.

Here's the template for the ball:

Once the paper ball is assembled, punch out your Petal Pairs flowers. For each flower, three layers are interlocked. The flower centres are Craftwork Cards Card Candi paper domes. Attach the Card Candi with sticky foam squares. Glue a flower onto each face of the paper ball (use PVA or glue dots). You must punch a hole in the centre of the flower on the bottom face of the ball - this is for the lollipop stick to pass through. 


The lollipop stick comes 15cm (6in) long. Cut it down to 12cm (5in). Colour the lollipop stick with a yellow felt tip. Spiral a strip of green quilling paper around the lollipop stick, gluing at the top and bottom.

The assembly instructions for the topiary tub are on the pattern template:

You can also use the flowerpot tubs to hold cake pops or lollipops!


The stick support is a square frame with a hole in the top. It sits in the bottom of the tub to receive the bottom of the lollipop stick. Put a dab of glue on each end of the lolliop stick: the top that is inserted into the flower ball and the base, which goes into the stick support.

Glue the tray onto the tub bottom. Glue the tub mat under the tray.

The finishing touch is a pretty taffeta bow. You need about 30cm (12in) of 12mm(5/8in) ribbon for each bow.

Stuff I used: Tonic Studios Petal Pairs Punches (originals and Petites), Wild Rose Studio Valetta Garden 6 x 6 paper pack, Craftwork Cards Card Candi, Bazill Basics cardstock, Wilton lollipop sticks.


You can also make mock-kusudama flower balls to use as ornaments or windchimes - but that's another post.

Big thanks to my daughter, Leah, for being photographer and style consultant!


Thursday 19 April 2012

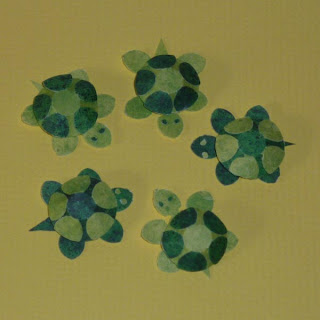
Tiny Terrapins

Petal Pairs pets - you know, for kids.


Here are some fun paper pets you can make with your kids. To make the tiny terrapins, you need Tonic Studios Petal Pairs paper punches: shape 6 (for the body) and Petal Pairs Petites shape 4 (for the shell).

Punch two shape 6s in green and trim each Petal Pair as shown.You must remove two petals from each - and you need to trim a pointy tail on the centre back petal. Overlap the join and glue with PVA to make the terrapin body as shown.

Next, punch two Petites - one in light green paper, the other in darker green. Interlock these Petal Pairs as ususal to make the shell. Cup the interlocked Petal Pairs to shape the shell dome. Glue the petals in place to fix the shape of the turtle shell. Almost done - attach the shell to the body with foam sticky squares - three stacked squares will do. You can either draw on the eyes with a felt-tip or glue on tiny punched circles (from a 1/16" circle punch). That's it!
Each Tiny Terrapin measures about 1" (2.5cm) across.


Have fun crafting your Petal Pairs pets!  


Paper: Craft Creations painted style - good motled effect for the shell!

Copyright the Papercraft Post 2012.

Wednesday 11 April 2012

"Organized Chaos" Mini Desk Caddies

Stacking system: cartons & drawers
Here's a fun-to-make stackable desktop organizer system of soda-carton-style caddies and matchbox-style drawers. The containers are just the right size to fit the "Pint-Sized Holders & Folders" envelopes made from Hot Off The Press Template 7390 (which I designed). The wonky stacking effect of the boxes reminds me of architect Frank Gehry's amazingly improbable crooked buildings.

I've been reading papercraft guru Paul Jackson's genius new book Structural Packaging: Design Your Own Boxes and 3-D Forms (Laurence King 2012). I thought I'd try out the Crash Lock carton base, which I have used on the caddies. The Crash Lock is a type of interlocking base which is easily assembled - and is also very strong. Very neat indeed, if one is a papercraft nerd : )

 You can use the caddy for storage on its own - or use it in combination with the matchbox-style drawers. The caddy is a one-piece pattern that will fit onto one piece of A4 cardstock. (I used Bazzill Basics Paper for the caddies and slightly thinner paper for the drawers.) Here are the patterns:
To make the caddy, cut out the shape, crease on the foldlines with an embossing stylus, tape the short tab to  make a ring. Then tuck in the bottom tabs like so:

You can tape two caddies back-to-back to make a double-sided unit, which will fit exactly on top of the matchbox drawers.

To make the matchbox-style drawer, fold the drawer, taping sides - and make a sleeve (pieced from two pieces of paper).

 
Caddy and matchbox drawer units.


Leaning tower.
Use this template to make the mini document wallets and envvies.

The mini-soda-carton caddies would be great for gift-giving. Just pop the contents in a cello bag. Or, you can make up a desk-caddy stocked with the Holders and Folders as a gift.