Monday 22 October 2012

Paper Punch Papel Picado

Mexican-style banners made with Tonic paper punches (and a die).

The Mexican Day of the Dead holiday is coming up soon, and that got me to thinking about the beautiful art of papel picado - Mexican papercutting. Authentic papel picado is crafted using tissue paper, a chisel, and a lead mat (those magnificent festive buntings are made up in quantity, cut out in stacks). But you can mimic the intricate filigree cuts of Mexican banners easily with your paper punches.

The buntings on my thank you cards are made with Tonic Studios products. For the straight lattice design, I used Simplicity Pattern Punch Doily Border 967e. The flags with the gently curving corner were made using the Doily Square Die (item 226e). The flower shapes were cut out with Petal Pairs Petites (I used Petites 1 no 892e, Petites 2 no 893e, and Petites 3 no 894e). It is important to use the Petal Pairs Petites because their smaller size makes a flag about the right size for a greetings card.

Remember to vary the colours, size, and styles of your flags. Note that the pennant-style flags have the punched border at the top. The teeny-tiny flags do not have a flower shape punched out. If you make a card with rows of buntings in graduated sizes, largest flags at the top to smallest on the bottom, then your card will have a perspective effect - like looking down a street festooned with bunting.

I used ordinary coloured paper from a pad for the bunting, and craft thread for stringing. To make each flag, punch the border first. Next, position the paper punch flower and cut it out. Cut the flag out around the punched shapes to engineer the position of the border and motif.

You can trim the punched borders in various configurations. If you are working with the doily, use it on point (love those handkerchief points!). I used a 1/16" circle handpunch to pierce the stringing holes at either side of each flag. Alternatively, you can pierce the holes with a needle - put a kneaded eraser underneath to receive the point.

For the card blanks, I computer-printed the greeting onto 160gsm copier paper. The patterned paper is October Afternoon Modern Homemaker, which isn't new - but is still available. I positioned a bit of punched border underneath the patterned paper strip as an accent mat and also glued punch-outs from the Petites as bullet-point-style embellishments next to the greeting.

You can use brads to mount the bunting on the card front - or you can just pierce holes and thread the craft thread through. For a side-opening card, you need one pierced hole on the opening side (wrap the thread around the edge) and two on the fold side (one hole placed on the fold).

You can also make bigger, more elaborate versions of the buntings and use them as full-size festive decoratations.

If you want to learn more about papel picado, there's a delightful book by Kathleen Trenchard called Mexican Papercutting (Lark Books, 1999). It's out of print, but you can still get hold of it on Amazon. Here it is:
The author is a big advocate of the art of papel picado. She has a website here: http://www.cut-it-out.org/


Enjoy punching out your festive buntings!

Now, I know that many craft-y people are already very busy with festive preparation of another kind. Please stay tuned, because I am planning a post on paper snowflakes made with the new Tonic Dies:


Thursday 18 October 2012

Book Review: Book Art by Clare Youngs


Book Art
Clare Youngs
Cico Books
ISBN 978 1 9081 70 92 7
£14.99

First off, this is the ideal gift book for a papercrafter. As befits a book entitled “Book Art”, the book itself is a thing of beauty. Classy design – hard cover (cloth!), stitched binding. Lovely photography and thoughtful styling.  Most importantly, quality content. Thirty-five charming and inventive step-by-step projects to amuse and fascinate. Timely, too­­ - fits in nicely with the trend for papercutting. (Suggestion: give a book gift this Christmas as an e-book antidote.)

I can whole-heartedly – and guiltlessly – endorse Clare Youngs’ delightful new craft title, Book Art. I have to admit, the concept of using books as a craft material has – until now- made me cringe. The term “altered book” – guaranteed to make me tune out. Crafter – spare that book! Especially in the age of the e-book, books of the papery kind are sacrosanct, an endangered species. Clare Youngs addresses this mini moral dilemma immediately in her intro. She makes it clear that she respects books and that the books for her projects are ethically sourced – that is, they are worn out, damaged, or have out-lived their usefulness. She also points out that many of her projects can be constructed using old catalogues or magazines. So I’m OK with it now – and can see how the idea of book art fits perfectly into the eco-craft/up-cycled category. I’m ready and willing to re-purpose old books and (especially) catalogues and mags!

So many crafts these days –even, surprisingly, papercrafts – are dependent upon buying expensive papers, products, and embellishments. But you can make most of the projects in this book with little more than printed matter, scissors or craft knife – and glue. So an A* for thrift.

The projects in this book have a quirky, naive retro charm. The author is an ace at paper manipulation, so it is no surprise to learn that she has a background in packaging design. The step-by-step format and template-based designs make this an ideal book for beginners. The photocopiable templates, at the back of the book, are clearly labelled for enlargement. But there is also plenty of inspiration here for the more experienced papercrafter.

There is  variety in the techniques used – lots of papercutting (as you would expect), but also quilling, stamping, simple book binding, origami/kirigami, torn paper,  and papier-mâché.  Stationery ideas, homecrafts, kids crafts (to make for or with kids). All boxes ticked. There’s even a section on Animals (cute, but not too twee).  The use of colour in the projects is impressive, and this is perhaps, surprising in a book with this subject. 

Every project here is a winner. My favourites include the Pigeon Message Card (carrier pigeon with paper strip message band on leg) and the Owl and the Pussycat Pop-Up (all singing, all dancing 3-D amazing). This book is a celebration of papercrafting.

Tuesday 16 October 2012

Doily Butterfly Gift Bags

Pretty pleated butterflies - made with Tonic Studios Doily Dies.
Two lattice square doilies to make the butterfly. Fine pleats (top) or wide pleats (above).
Lacy butterflies here - made from square and circle dies.
These butterfly gift bags are fun, easy, and quick to make. The butterflies are crafted with the new Tonic Studios dies. 

The top style, with the lattice butterfly, is made using the Doily Square Die 226E. I used origami paper for easy folding and sharp creases. You need two pieces of paper for each butterfly. I chose a plain colour for the top wings, and a gradient paper for the bottom wings (to create a lovely hombre effect). 

My die-cutting device was a Cuttlebug. My plate stack, from bottom up:
A plate, C plate, die (ridges/cut side up), origami paper (right side up), shim, B plate. My shim was a folded piece of 160gsm cardstock. You can cut up to three pieces of origami paper at a time. I like to have a die-cutting session to make a stash of doilies.

Here is how to pleat and prepare the butterfly wings:

Hold each doily on the diagonal. Trim the sides of the gradient doily as shown. Crease each doily in half vertically, open out. Now, fold each doily in half horizontally, in half again, and in half again, and in half once more. Crease the folds. Open out the doily. You have divided it into sixteen horizontal folds. Accordion-pleat the folds of each doily, creasing as you go. 

Pleat, stack, and wrap the wings.

Now, take a strip of 2mm (1/16in) quilling paper and cut it in half. Fold one piece in half for the antennae. The remaining piece is the centre wrap. Stack the wings on top of each other, as shown. Wrap the quilling paper around the centre wing fold, catching in the antennae strip at the top. Glue the end of the wrap with tacky glue applied with a cocktail stick.
 With a quilling tool, twirl a loose coil at each strip end.

Time to spread those butterfly wings! The butterfly is now complete.
Here are some butterfly variations:

Above, lattice butterfly with wide pleats: divide into eighths instead of sixteenths.

This butterfly was made using Tonic Studios Daisy Square Die (225E) for the top wings and Tonic Studios Daisy Circle Die (221E) for the bottom wings. When using the daisy dies, fold them into eighths, never sixteenths. Above, the top daisy square is held on the diagonal - this creates pointy wings.

Above, the top daisy square is held horizontally, creating chunkier,
arcing wings.

Here is the pattern template for the gift bag and tags:

The bag design is a modified pillow box - pillow base, handle top.
I used American Crafts Cardstock for the bags. Cut out the bag and score the fold lines with an embossing tool. A tip: cut out an eye-shaped template out of scrap card like so:

Use this as a guide to mark the curve at the base of the bag. Crease all the bag folds - a bone folder is handy. Seal the bag side flap with either tacky glue or double-sided tape. Pop a sticky dot onto the underside of the bag front base fold - I used a 3D Dodz from Scrapbook Adhesives by 3L. Shape the curve of the base flaps with your thumb, and seal the flap shut. You can seal the handle flap with another Dodz, once the contents are in the bag. The butterfly is also fixed onto the bag front with strategically-placed Dodz.
The butterfly bags are ideal for parties - fill them with sweets and/or favours. The tags can serve as place cards. The bags are also ideal gift packaging for jewellery and small objects.


Saturday 6 October 2012

Petal Pairs Ribbon Reels & Gift Basket Tutorial

Flower-shaped ribbon reels and a presentation basket.
Today's project is part of the Papercraft Fabrications strand of sewing-related makes. 

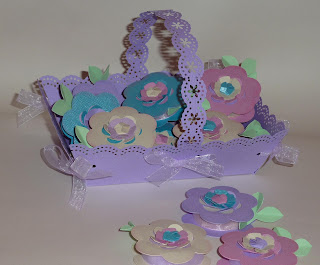
The garden trug-style gift basket holds about a dozen dainty ribbon reels. Makes a lovely gift. The self-adhesive tab to secure the ribbon end is disguised as 3D leaves.

Here's how:
 

1) Cut out the pattern pieces (templates below, at end of tut). For each ribbon reel, you need the top and bottom reel drum, the reel barrel (drum side band - with the teeth), the flower top and bottom, and the leaf tab. 

Prep: Pierce a hole at the flower and circle centres - very important - this is used to align the pieces. Score across the length of the drum side band just below the teeth with an embossing tool and fold the teeth inwards. Cut the swirl slits on the flower top with a craft knife (use a mat). Bend the swirl slits upwards to form the 3-D flower shape. Chalk the edges of the flower top and bottom. (Bazzill Basics cardstock used - good weight, nice texture.)


 2) Glue the side tab of the drum band and join the band into a ring.


3) Pencil around the drum sides, to make placement circles on the wrong side of the flower top and bottom. Centre the circle on the flower by placing a cocktail stick through the centre holes.

4) Apply tacky glue around the outer edges of the drum circle. Glue onto the folded "teeth", aligning edges. Smooth in place. Flip the drum over.  Apply glue to the second circle and glue it onto the other side. The drum is now complete. It is a sealed, flat cylinder.
 5) Glue drum to flower bottom.


6)  Apply tacky glue onto the centre of the flower top and in a ring outside the petals. 


7) Glue the flower top onto the drum top. Use a cocktail stick to position the flower, matching the centre holes of flower and drum. Align the petals so top scallops match those on the bottom flower. Make sure that the flower petal cut-outs do not get glued down. Note the peek-a-boo effect: the colour of the drum can be seen through the flower petal cut-outs.
8) The centre flower feature is made using Tonic Studios Petal Pairs Petites punches (shown: PP Petites 4 - item 895e). Punch out three flowers, two of like colour, one contrasting. The flower is assembled using the Petal Pairs Centre Perks technique (see my earlier blog post: http://thepapercraftpost.blogspot.co.uk/2012/02/best-buddies.html, Best Buddies, 27Feb 2012). When you assemble the flower, make sure that the contrast-coloured flower is face down.

9) Folding the Centre Perk: fold the contrasting-coloured petals so they meet at the flower centre. Fold the petals down consecutively,
tucking the last one under. Since you fold the petals under, the textured side comes out right-side-up in the finished Centre Perk flower.

10) Stick the Petal Pairs flower onto the ribbon reel top. I used 3D
Foam Squares from Scrapbook Adhesives by 3L.

11) The ribbon reel structure is now complete - time to load on the ribbon. Stick a piece of double-sided tape onto the end of the ribbon, fix it onto the reel barrel, and wind the ribbon on, keeping a constant tension. (I used Crafty Power Tape from Scrapbook Adhesives by 3L, which is super-sticky for repeated ribbon fastenings.) Ribbon, of course, comes in different widths - so on the pattern template, below, you are given a choice of reel barrel widths.


The leaf-shaped ribbon tab secures the ribbon tail to the reel. Score a V-shaped vein at the leaf centres, clip the leaves to the centre of the V and fold them upwards. Apply double-sided tape to the wrong side of the "stem" of the ribbon tab (Crafty Power Tape from Scrapbook Adhesives by 3L again.) 
12) When you apply the tab to the ribbon, fold the stem at an angle so that the leaves are visible beyond the flower. Fix it onto the ribbon like so:

The ribbon reel is now complete! Make one, or make a baker's dozen.

 
Pic above shows the ribbon reels with various centre flowers achieved with Petal Pairs Petites punches. Left to right: Petal Pairs Petites 2 (893e), PP Petites 4 (895e), and PP Petites 1 (895e).


Pressed for time? Above is a no-frills version of the ribbon reel flower.
The flower petal cut-outs have been eliminated - and a larger, standard-sized Petal Pairs punch has been used to make the outer petals of the centre flower.
Above, the no-frills ribbon reel with punches. Left to right: Punch from Petal Pairs Box Set 3 (882e) for the outer petals, and PP Petites 4 (895e) for the Centre Perk.

Time to make the basket now. Very simple to do:


1) Cut out the basket base and score the folds using an embossing tool held against a metal ruler. Punch the holes for the ribbon ties. Use a 1/8in circle hand punch. Position the holes about 2.5cm (1in) up from the base and 1cm (3/8in) in from the sides. Mark the widthwise centre of each basket side on the inside of the basket in pencil. A Tonic Studios Simplicity Geared Pattern Punch (style 948e Dotty Border) is used to create the lacy basket border.
 2) Place the first punch at the centre of each side. Work outwards to the edges, right and left, to complete the border. The geared punch cuts like butter - no elbow grease required.

Pic above shows a completed punched side. Remove the waste paper above the scallops and repeat for the remaining three sides of the basket base.


3) Punch a handle strip (Tonic Studios Simplicity Geared Pattern Punch,
Daisy Strip, item 940e). Just work your way along the edge of the paper until desired length is achieved. About 25-28cm (10-1/2 - 11in) is about right. (Tip: save the evacuated flower centres from the punched border. You can use them for as embellies for a future project.)
 4) Glue one end of the handle inside the basket at the centre on a long side.


5) Punch (or pierce) holes to either side of the handle, just below the punched border.

6) Use a tapestry needle to thread a 30cm (12in) piece of ribbon through the handle holes. Tie a bow; trim the ends; repeat for other side:
7) Tie a bow in each of the basket corners; 30cm (1in) of ribbon as before. For a secure bow that lies flat, bring a ribbon end through to the inside of the basket and back to the front, encircling the corner ribbon, then tie the bow on the front. Like so:
Here's a view from inside the basket:


You can see how the ribbon is encircled at the corner, keeping it close to the basket sides. Neat. Repeat for remaining three basket sides and your basket is complete.

If you prefer a tray-style basket, just omit the handle.

You'll be wanting these:


So, there you go - Petal Pairs Ribbon Reels and presentation basket. If you a in a hurry, a single ribbon reel in a cello bag makes a nifty small gift.

By the way, today is World Cardmaking Day:
: ) See what I did there. The ribbon reels and leaf tabs have been re-purposed. You can also use them as giftwrap embellishments.

That's a wrap for today's tut.

Big thanks to Leah, my patient photographer and adviser.