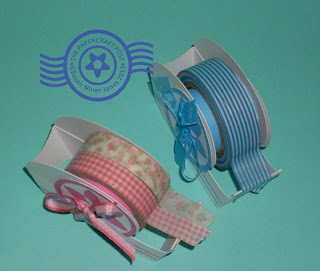
Wonderful Washi Tape! It is an affordable gift of choice for papercrafters. Today's blog is a tutorial for making papercrafted Washi Tape Gift Dispensers. These pretty dispensers have a life beyond gift presentation. Today's freebies: printable pattern templates for the dispensers.
Here are the downloads:
WashiTapeDispenserBlue.pdf
WashiTapeDispenserOrange.pdf
WashiTapeDispenserPink.pdf
Suggested cardstock for all methods: Bazzill or American Crafts. Print the designs on A4 cardstock. If using a Silhouette machine, remember to turn on the registration marks.
Here's how-to:
1) Prep the dispenser pieces. Hold an embossing tool against a metal ruler to mark the fold lines, then crease the folds. Glue reinforcements
behind dispenser holes, tape reel sides, and buttons.
2) The pic above shows how to use the measuring guide to divide the dispenser cutting edge into thirds.
3) The pic above shows the first section of the dispenser cutting edge which has been folded to the inside and glued down. Next, turn down the folded edge to bottom of the dispenser and glue it down.
4) Turn the dispenser to the right side. Cut a piece of serrated card to fit the dispenser cutting edge. The serrated strip has been recycled from a box of plastic wrap. Glue the strip onto the dispenser, slightly overlapping the edge. Tacky glue is recommended.
5) The pic above shows how the serrated cutting edge projects above the paper edge.
6) Glue the tab to complete the dispenser body.
7) Above, a pic of the completed dispenser body.
8) Time to assemble the tape reel. Shape the reel barrel around your fingers, gently curving it. Glue the tab to form a ring.
9) To complete the tape reel, apply glue to the tabs and glue a reel side onto each side of the barrel, to make a drum shape.
10) Insert the reel into the centre of the Washi Tape roll.
11) If you have not already done so, glue a reinforcement onto the wrong side of each button.
12) Cut a 35cm (14in) piece of narrow ribbon and thread it through the button holes. Place half the ribbon on each side.
13) Thread the ribbon tails through the eye of a tapestry needle. Place the tape reel inside the dispenser. Important: Make sure the free end of the Washi Tape faces the dispenser cutting edge. Draw the ribbon through all the holes, to the opposite side of the dispenser.
14) Thread each tail of the ribbon through a hole in the button.
15) Tie a bow and trim the ends. The Washi Tape Dispenser is now completed.
Above, a pic of the Washi Tape Dispenser from the other side.
There's a shaped grab handle at the back.
Above: if you enlarge the pattern, then you can fit two tape reels in a dispenser. You may have to adjust the size of the tape reel and dispenser to fit your reel of Washi Tape - not all reels are the same size. Do it by enlarging or reducing the pattern template on a photocopier.
 | ||||
| Roll call! |


So cute! Thanks for sharing!
ReplyDeleteChristina
Very clever...especially recycling the serrated edge!
ReplyDeleteVery cute, thanks for sharing.
ReplyDelete