Friday 26 July 2013

Paddle Fans

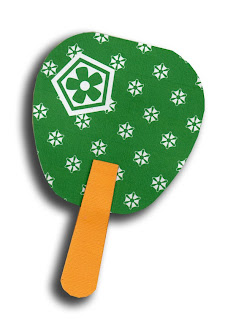
More fans today - oriental-inspired paddle fans, made entirely of paper.
Simple to do. Print out the designs, cut them out, glue the fans together. The "secret" is a middle layer of chipboard.

The decorative patterns on the fan are inspired by origami paper. 


Here's a pic of what each download looks like:
The white gap in the paddle base is for positioning the handle. But if you prefer to use your own lolly-stick-type wooden handles - like the ones used for wedding fans, just un-group the fan paddle design and remove the white gap. (That advice is for you digi-cutters out there.)

Here are your free fan downloads:
PaddleFanA.pdf
PaddleFanA.svg
PaddleFanB.pdf
PaddleFanB.svg
PaddleFanC.pdf
PaddleFanC.svg

To make the fans:

1. Cut out all the pieces by hand (.pdf) or digitally (.svg, .studio). For each fan, you need to cut out two printed fan paddles, two printed fan handles. From chipboard, you need one fan paddle and two fan handles. 

2. Glue a printed paddle fan onto either side of a chipboard fan. To do this, apply tacky glue around the outer edges of the chipboard - also a bit in the centre. Use a cocktail stick applicator. Smooth the paper on with edges aligned. Colour the white edges of the paddle fan with a felt tip in a matching colour.

3.For each side of the handle, glue a printed handle onto a chipboard handle and colour the edges with a yellow felt tip. 

4. Apply d/s tape to the marked area on the fan front and stick the top of the handle on within the indicated area. Turn the fan over. Apply d/s tape all along the remaining fan handle (you may prefer to glue). Stick on the second fan handle, with edges aligned, and wrong sides facing.
All finished! 

You can make these fans up quickly in quantity.


Thursday 25 July 2013

Print-and-Cut Fans ... plus No-Hassle-Tassel Tutorial

Fan on left is digi-cut, fan on right is .pdf hand-cut.
Choice of colourways.
Cut out, accordion-pleat, staple... tah-dah! Cool : )

Here's a quickie project that might just come in handy during the heatweave. An easy-make accordion-pleated fan in an engineered print.

To make, just download and print out the design. Cut it out, digi- or by hand (if cutting by hand, use a craft knife and ruler for the straight sides, scissors for the scalloped edge). Score the pleats using an embossing tool held against a straightedge. Pleat the pleats - use a bone folder for nice, crisp ones. Staple the handle. 

The tassel is optional. If you do want a tassel, punch a hole in the fan handle with a 1/16" circle hand punch. The tassel is easily made from craft thread and the tut follows.

Here are your free fan downloads:
Fan.pdf 
Fan.svg 
FanBeachGlass.svg

"Beach Glass" refers to the blue/green colourway. It reminds me of beach glass. See, you feel cooler already!

No-Hassle-Tassel Tutorial


1. You'll need craft thread in two contrasting colors, scissors, a tapestry needle, and a piece of card the desired height of your tassel (6-7cm/2-2-1/2in) with two notches cut in the bottom.
2. Make the tassel body out of the lighter thread colour. Catch one end in a notch and start wrapping, butting adjacent wraps against each other. Twenty wraps in all.
3. Catch the thread in the second notch when you are done wrapping.


4. Cut a piece of craft thread, make a loop and tuck it under the top of the wrapped threads.
5. Thread the tails through the loop and pull it tight.


6. Cut straight across the bottom of the thread to free the tassel from the card.
7. Trim the thread ends level.
8. Now for the "magic" bit. Cut a length of contrast thread and make a loop. Lay the loop lengthwise along the tassel, loop end down.
9. Take the longer free end of the contrast thread and wrap it around the tassel, starting at the top and working downwards, catching in the loop, but leaving the loop end visible. Wrap firmly, placing the wraps close together.
Thread the wrap-end through the bottom loop.  Next, pull slowly and steadily from the top.
10. Now thread the end of the wrapping thread through the loop. You can use the tapestry needle to do this. To finish the tassel carefully and slowly pull the shorter free end at the top of the tassel wrap. This will  draw up the loop at the bottom and the thread within it, encasing them within the spiral wrap so they cannot unravel. You can trim off the remaining thread end at the top of the tassel-wrap. The tassel is now finished.


11. To finish the fan, thread the tassel through the hole in the base of the fan and tie it on, trimming the thread ends.

Thanks to Leah and Michael for taking the pics on a hot day.

Tuesday 23 July 2013

Lacy Loopy Flowers

I had a couple of card blanks left over from the previous project, so I thought I'd do another idea using the same backgrounds. These Lacy Loopy Flowers can be layered and interlooped. Mix 'em/match 'em. Go wild.

I'll tell you why I did this project today: the Lacy Loopy Flowers remind me a bit of snowflakes. And that makes me think cooler - even though the temperature is sky high!

Here are the downloads:
LacyLoopyFlowers.svg

Have fun. Go loopy.

Iris "Cheater" Flowers

These cards are inspired by iris folding - and "cheater" patchwork fabrics. You are probably familiar with the papercraft of iris folding - it is delightful, but labour-instensive. Love the look, with the vortex of folded edges in mixed prints. "Cheater" prints are familiar to fabric designers - they are when the illusion of patchwork is created by dropping a selection of mixed prints into the same design.

The mixed prints are visible through the cutouts in the flowers. Here's how:

Just place the mixed-print base layer under the cutout flower, with flower edges aligned and cut-out orientation the same. Sticky pads -  3D Foam Squares from Scrapbook Adhesives by 3L fix the layers together and add dimension.

Here are your free downloads:
IrisCheaterFlowers.pdf
IrisCheaterFlowersSelect.svg

The designs are easy enough to cut out by hand, hence the .pdf. You'll need to take some care and use a craft knife plus cutting mat for the iris cut-outs on the flower top. 

If digi-cutting, feel free to tweak the sizes and colours of the design elements. 

The gradient backgrounds and card sentiments are not included in the download - but you have plenty to play with! Enjoy.

Monday 15 July 2013

Russian Doll Pockets: Print-and-Cut!

Papercraft Matryoshka: nested paper pockets.
The flip side is patterned, too!
The printout looks like this.

You guys are my guinea pigs. I'm learning how to create prints and patterns on the computer - early days, training wheels. These Russian Doll Pockets were the ideal project to try out some mixed ditsy prints on. 

This is a fun project to make whether you are entertaining a bored child over the summer break, or are getting an extreme headstart on festive decorations.

Here are your free print-and-cut files:
RussianDollPockets.pdf 
RussianDollPockets.svg 

To make the Russian Doll Pockets: 
1. Cut out the template pieces, either by hand or by digital cutter. 
2. Fold the pocket flaps to the back. Align the folds with the base of the
matching Russian Doll. Glue the pocket flaps to the doll back.
3.With wrong sides facing, glue the doll backs to the doll fronts, matching corresponding doll sizes (of course). Finished.
4. Slip the dolls into the pockets and nest the dolls.

Have fun!


Sunday 14 July 2013

Matchbox Suitcase Bon Voyage Gift

Enclose a small gift in the matchbox drawer. Bon voyage!
Graduated sizes!
Choice of tags.
A quick-make for the summer hols. Matchboxes are irresistibly cute - and so easy to  make. These matchboxes are in fancy dress to look like miniature suitcases. A fun alternative to a bon voyage card for travelling friends. Enclose a small gift - sweets, souvenir dosh. Up to you.

Free downloads plus a tutorial follow. There's a .pdf because this project is simple enough to make by hand.

MatchboxSuitcase.svg
MatchboxSuitcase.pdf 

Matchbox Suitcase Tut
1. Above, suitcase pieces cut out and folded. Left to right: matchbox drawer, matchbox wrap, suitcase handle (top), suitcase straps. Choose a fun print for the wrap or go for leather-look textured paper.

2. Pic above shows the outside of  the matchbox drawer. Double-sided tape is applied to the tabs. (Alternatively, it is OK to glue the tabs.)
3. Pic above shows the inside of the matchbox drawer, with tape on the
side flaps.
4. To assemble the drawer, stick each side tab to the adjacent side.
5. To complete the matchbox drawer, fold the side flaps to the inside. Like so:


6. Now for the wrap. If you inspect the wrap pattern piece, you will see that one end flap is a smidge wider than the other (shown by arrow). This is the flap which you glue on the outside. Like so:
7. Next, glue the inside of the handle together. 
8. Apply d/s tape to the top of the handle flaps.
9. Insert the handle into the slot in the suitcase strap piece. 
 Then join the suitcase strap piece to make a loop. Like so:
The completed suitcase straps form a cage which is slipped over the matchbox.
10. To complete the matchox suitcase, simply slide the straps over the matchbox. Ease the straps on and move them to the centre of the matchbox. Tie on the tags for the finishing touch. Good to go!


Above, my primitive photo-editing skills. I'll get there eventually. Patience!

To open the drawer, just push gently from the opposite side. You can add a pull tab if you wish (given on the template).

Thanks to Leah for taking the big pics and to Michael for photographing the how-tos on a very hot day.