Sunday 25 August 2013

Button Boxes


I have buttonmania. I've had it ever since I was a kid - I used to love playing with the buttons in the box with the picture of a swordfish on the lid. These days, I like to give buttons as a gift to my sewing-enthusiast friends. Today's project: gift packaging for buttons. Choice of mini-milk cartons or matchboxes. Either way, easy make.

I have been studying how to design pattern repeats on the computer - and these projects are my training sessions - and you guys are my guinea pigs. I did manage to tackle a fairly complicated pattern - so that's progress.

There are mini-tutorials to accompany the free downloads.

ButtonCardMatchboxLtBlue.pdf
ButtonCardMilkCartonLtBlue.pdf
ButtonPrintMilkCarton.pdf 

Button Box Milk Carton Tutorial

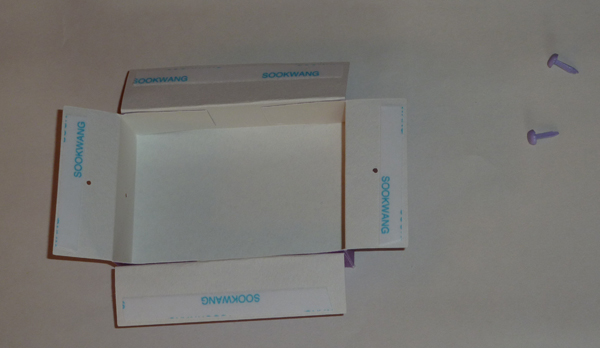
1. Milk Carton components. The fold lines have been scored. The triangular folds on the milk carton sides can easily be scored using the crosswise fold and the notch at the top as guides. On your printout sheet, there are two notches to either side of the milk carton. These are your guides for marking the fold across the top part of the carton.
The lines on either side of the milk carton are score guides.


2. Join the long side flap to assemble the box (use d/s tape or tacky glue).
3. Interlock the base folds. Fold them down one-by-one. Tuck the last one under.
4. Add a base seal to secure the folds. Attach it with a glue dot. (I used a Dodz by 3L.)

5. Pinch the side triangles in. You need 30cm (12in) of 6mm (1/4in) -wide ribbon for the bow. Thread it though the holes starting from the front. Catch in the tag loop as you thread the ribbon through the side.


6. Tie a bow at the front, trim the ends. (Of course, fill the box with buttons before you do so!)

Button Box Matchbox Tutorial
1. Above, matchbox pieces cut out and prepped. Pic shows the inside of the matchbox drawer with d/s tape applied. You also need to apply d/s tape to the right side of each corner tab.
2. Pic above shows matchbox drawer with adjacent sides taped. Next, fold in the flaps and insert the two brads (the drawer pulls).
3. Above, drawer assembled. Tape applied to wrong side of the matchbox wrap.
4. Wrap the wrap around the draw before you tape the seal - this helps you get a good fit. You may need to adjust the size of the drawer depending on the thickness of the cardstock used. Enlarge or reduce by a few percentage points as necessary. You can tie your gift tags onto one of the brads for gift presentation.
In case you were wondering, the lovely buttons that I used as props are Jenni Bowlin Vintage Sew-On Buttons, which I have been hoarding. (I knew they'd come in handy!)


No comments:

Post a Comment