More Ski Sweater-themed festive makes. (When I have an idea, I run with it : )...) Cards and envelopes today. Two types of cards, two types of envelopes. All can be swapped around. The cards are proper cards with greetings inside as well as outside. The printables fit nicely onto an A4 sheet of paper.
Choice of two types of envie: office-style or tab-close. The envelopes measure about 8 x 11cm (3-1/8 x 4-1/4) inches. So we are talking dinky cards here - cute, but not microscopic.
The standard-type card, shown above, is a fold-over design - just fold it in half, then in half again. Crease the folds with a bone folder for a nice crisp appearance.
The mitten cards have a mitten-shaped greetings insert for the inside page - simply attach it with a snippet of d/s tape at the top.
Time now to explain about the tab envelopes (above). The closure flap has a projecting tab. You have a choice of three seal designs to put on the flap. (Stick the seal on with a bit of d/s tape or a smidge of glue stick.) Tah dah! Perfectly centred seal every time. To close the envelope just add a sticky dot on the underside of the envelope tab (Dodz by Scrapbook Adhesives by 3-L). That's your de-briefing. A mini-tut on how to fold the Office Envelope will follow. But first... Here are your free downloads: Fold-OverCardRed.pdf Fold-OverCardGreen.pdf OfficeEnvelopeRed.pdf OfficeEnvelopeGreen.pdf
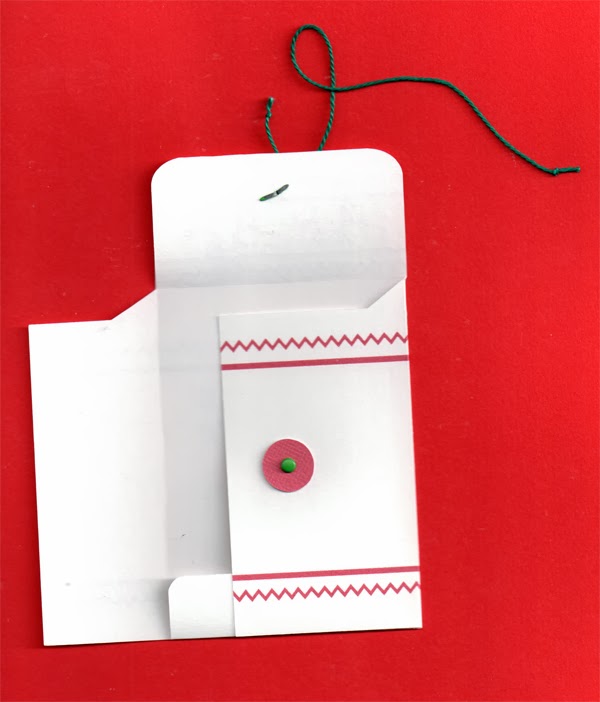
1. Above, the office envelope with folds creased. Note that the top flap is creased above the diagonal corners. While the envelope is unfolded, insert the brads through the brad mats. You need about 25cm (10in) of craft thread for the tie. Attach the tie with a loop - a slipknot around the brad, under the brad mat.
2. Fold up the bottom flap. Apply d/s tape to the right side of the bottom flap, then fold over the longer envelope side as shown.
3. Apply d/s tape to the bottom edge and the long edge of the remaining envelope side. Next, carefully fold the envelope side to the centre of the envelope, sliding it under the brad mat. Smooth down the edges with a bone folder. All done!
Pic above shows both sides of the envelope. The name has been added by computer - but you might want to try a bit of calligraphy for a handmade touch. (Note: to type in the name in .studio, you will have to ungroup the elements of the cutting file first.)
These cute little cards would be ideal to hand out in the classroom, or as greetings for your neighbours. They are also just right if you want to add a personal note to a gift - kind of a gift tag plus.


No comments:
Post a Comment