Thursday 27 February 2014

Letter Art by Clare Youngs: Book Review


Letter Art:

35 stylish letters to make and give

By Clare Youngs

CICO Books, April 2014

£14.99 Hardback

ISBN 978-1-78249-084-5


Star rating: ****


Clare Youngs, CICO Books star craft author, has come up with a fontastic :) idea for a new title: letterforms in all shapes, sizes, and media. Drawing on her background in graphic design, Clare has produced a book full of typographically-inspired designs.


In olden days, familiarity with typefaces used to be the domain of professional graphic designers and typesetters. Now that everyone has access to computer word-processing, everybody’s got a favourite font. And of course, alphas are especially important to card-makers and scrapbookers.


Most of the projects in this book are large-scale home dec ideas – the sort of thing you’d pay a mint for from a trendy mail order company. The projects look just great, are do-able – and inexpensive, to make, too. Lots of scope for using re-cyled materials. Super graphics, in all senses.


Letter Art is not exclusively a papercraft title, but papercrafting does feature prominently in it, even in the sections not devoted to papercrafts (as you would expect). The book is divided into the following sections: Papercraft Letters, Painted and Printed Letters (lots of paper-based stuff here), Mixed Media Letters, and Fabric Letters


The attractively-photographed projects are accompanied by easy-to-follow step-by-steps, illustrated by (wait for it) --- Clare and Ian Youngs (understanding of the brief guaranteed!). There’s a section of reduced-sized templates back-of-book – but you are encouraged to use the letterforms of your own choice.


Of course, letters and paper go together – and as a papercrafter, I do think that the papercraft projects are the most successful. Some of the projects include: Vintage Graphic Letters – choose a letter, enlarge it and 3-D-ify it in cardboard covered with patterned paper. Foamboard Lollipop Letters: whimsical letters-on-a-stick. (Could make a fun birthday party centrepiece.) Sculptural Scrollwork: jumbo quilled letter. The Mexican Paper Letters work a treat: trad Mexican papercut tissue paper, but in letterforms. The Corrugated Capital is a very clever idea. The ridges of the corrugated card are selectively flattened to create areas of light and shadow. The Slot-Together Letters in mixed prints work a treat. Reflecting the popular Circus-trend in typefaces, there’s a Fairground Flair 3-D letterform.


If you are up for trying projects outside your papercrafter’s comfort zone, there’s lots to choose from. There’s the Wire Cage Letter (wire-cutters required), and the Fruit Crate Letter (some woodworking lite called for). 


So – Letter Art amounts to big fun with jumbo letterforms. This title would make an ideal gift for a crafter.  It comes out in April – so you can pre-order it now.  And I will eagerly anticipate whatever Clare Youngs turns her very creative hands to next.


Note: I was supplied with a review copy of this title.

Tuesday 18 February 2014

One-sheet Pop-Ups

Card above, folded flat.
Yesterday I featured Paul Jackson's new book on simple one-sheet pop-ups. For today's post, I've done a quick study and come up with the cards above. Still on my training wheels - nothing really fancy in the cut-and-fold department, but I think you can see how one-sheet pop-ups can be very effective - and fun.
I added a strut to the designer shopping bag birthday card, so that it can be propped up, easel-style (but it still fits on a single sheet of A4 cardstock). The shopping bag also has a gift tag, as an additional feature.
Here are your printable cards:
FlowerThanksPop-Up.pdf 
FlowerpotThanksPopUpSelect.pdf
ShoppingBagBirthdayPopUp.pdf
The flowerpot and shopping bag cards have how-tos printed on-page, to talk you through the cutting and folding.
The flower Thanks card is pretty simple - so no on-page instructions.
Just cut the card out, cut the scalloped slit with a craft knife, then score the folds. Examine the photo to see how the card is folded, taking notice of mountain and valley fold directions.
These cards collapse down flat for posting. The flower card and the shopping bag card fold down into neat rectangles. The flowerpot card folds down into an irregular shape, which is more than compensated for by the surprise factor when the recipient opens it up in its 3-D splendour!
Don't forget to check out Paul Jackson's new book to learn about designing your own one-sheet Pop-Ups.


Monday 17 February 2014

Pop-Up Designs by Paul Jackson: Book Review

Cut and Fold Techniques for Pop-Up Designs

By Paul Jackson

Laurence King Publishing, March 2014

128 pages

Paperback, £15.95

ISBN 978 1 7806 7327 1


Star rating: *****


Papercraft expert extrordinaire Paul Jackson is back with a new addition to his excellent series of papercraft design titles for Laurence King Publishing. The subject of this title is pop-ups – I know, smile – but the content of the book is not what you are probably expecting. No, it is not slide-rule time for paper engineering geeks, but rather a streamlined system for designing one-page pop-ups

Written with the design professional in mind, the idea is to create a simple, attention-grabbing 3-D pop-up suitable as a backdrop for printed advertising – from just one sheet of card. Clock that, papercrafters: no gluing, nothing fancy. Stunning results from just one sheet of cardstock. According to the author, the technique “creates ‘negative’ (or empty) spaces behind sections of card which have been cut and folded to stand forward, so for every negative void there is an equivalent ‘positive’ of card.” The results are dramatic – sculptural, even architectural. Card-makers: this is the mother lode!

Like all of Paul Jackson’s titles in the series, you are taught the principles of the concept so you can master it and design for yourself. You learn how to create combinations of folds and cuts to make 3-D pop-ups that fold down flat. The first chapter shows how a simple slit in a piece of card can produce a variety of results, depending on how the paper is folded. In Chapter 3, Developing the Basics, you learn how to “Take the Cut for a Walk” – make a more complex cut line to create striking results. When varying the card silhouette is added to this, your options are multiplied bigtime (curvy or zigzag cut + different card outline shape = infinite possibilities). Chapter 4 is Releasing the Folded Edge. Here, you learn to create projecting sections along a crease to dramatic effect. Designs that really stand out! Chapter 5 is Multiple Gutters and Generations – fancy facetted creations – one-page pop-up graduate school, you might say.  Wow factor and something to aspire to. 
This book accomplishes its aim of teaching a specific papercraft design skill. It achieves this aim clearly, concisely, in style, and with humour and enthusiasm. 
Don’t forget to check out Paul Jackson’s other titles for Laurence King. You can build up a mini-library of papercraft titles to add to your papercraft expertise. Although written with the design professional in mind, these titles are user-friendly and completely accessible to the hobbyist papercrafter.

These titles are:

Structural Packaging: Design Your Own Boxes and 3-D Forms

This title, my personal favourite, is indispensible. It teaches you how to design a net – the 2-D pattern template for making a 3-D box.

Folding Techniques for Designers

This book is ideal for origami enthusiasts. It teaches how to create fancy multi-facetted folds ( these are currently in vogue for lampshades).

Cut and Fold Techniques for Promotional Materials

Fun stuff! Interactive novelty designs, such as flexagons - neverending movable folded shapes. The chapter on envelopes is superb.


In my next post, I’ll be featuring some one-page pop-ups that I’ve crafted after doing a quick study of Paul Jackson’s new book.

Note: I was given a review copy of this title.


Sunday 9 February 2014

Valentine Cards - last-minute printables!


Screen-style pop-up.
Fold panels back and stick down for a conventional-open card.
Clock the presentation pocket!
There's a simple-fold card with a liner, too.
Also with a presentation pocket.
Option A: simple pop-up.
Option B: flat with liner.
Some last-minute Valentine cards for you today. Simple to make - print and cut - not much sticking. There are two styles to choose from: a pop-up screen-style (as in furniture, not as in computer) card, and a conventional-open card with a patterned liner. Both cards have presentation pockets instead of sealed envelopes - the likelihood being that there will be no need to mail the card to your nearest and dearest!

The floral print on the cards is inspired by Love Hearts candy. (If you look closely at the flowers,  you will see that each petal is adorned with a Love Heart and phrase.)

Here are your printables:
LoveHeartPop-Up.pdf 
LoveHeartPop-UpPocket.pdf 

LoveHeartValentine.pdf 
LoveHeartValentineLiner.pdf 
LoveHeartValentinePocketFront.pdf 

LoveHeartValentinePocketBack.pdf 

How-Tos:
Pop-UP
To make the pop-up, print out the card and cut it out. With a craft knife, cut the two arcs on either side of the flower circle (pic above). Score the fold lines indicated. Make sure you score the centre fold across the centre of the big flower. To fold the card, accordion it, folding the flower circle as a mountain fold, and the areas above and below the flower circle as valley folds. 

This type of simple one-sheet-of-paper pop-up is the subject of a genius new book by Paul Jackson, papercraft guru extraordinaire:
(I'll be featuring more about this amazing new book, soon.)

The pocket for the pop-up is of one-piece construction. Cut it out, score the centre, bottom and side folds. Tuck bottom and side flaps under and stick them down. Finished: slip in the card. 

Love Heart Valentine

To make this card, print, then cut, the card and liner. You only need to secure the top of the liner to the inside of the card blank. Use a bit of d/s tape or a glue stick. The liner looks classy in translucent paper - like lightweight parchment.

The pocket for this card comes in two pieces, due to the size of the card. Cut out the pocket front and fold the flaps on three sides. Cut out the pocket back. Stick the folds onto the back piece. Your choice as to whether you put the printed side on the card back facing frontwards or to the back. Finished: slip the card in.

No sweets as props for this photoshoot - holding out for Valentine's Day for anticipated non-prop sweet treat!

Have a great Valentine's Day.

Friday 7 February 2014

Valentine Gift Printables

Here are some Valentine printables that you can make up in no time. The theme: Love Heart sweeties, so my guess is that you'll fill them up with sweet treats. Choose from gift bags or ice cream cups.

Here are your free downloads:
LoveHeartsGiftBagA.pdf 
LoveHeartsGiftBagB.pdf 

IceCreamCupScallopsA.pdf 
IceCreamCupStraightA.pdf 

IceCreamCupStraightB.pdf 
IceCreamCupBLidsBase.pdf 
IceCreamCupScallopsB.pdf 

As you can see, you have your choice of two gift bag shapes. The ice cream cups come in two prints, in either straight- or scalloped top. 

Everything is easy to make - so no tut today. For the bags, crease the folds, stick the side seam, and insert the base tab - you're done (apart from the gift tag and optional bow). You can make the bags foldable or more boxlike depending on the weight of the cardstock you choose.

Ice cream cups: flex the body piece to make it curve gently. Stick the back seam. Fold the base tabs. Apply glue to the tabs and lower the base into the cup. Make sure you do this on a firm surface. Make sure the base is flush with the surface. Next, adhere the tabs. Add the gift tag - tie it on through one of the slots. Fill the ice cream cup with the contents - the lid tabs fit in the slots.

Have a sweet Valentine's Day!


Tuesday 4 February 2014

Valentine Goodie Bags


Some sweet shop nostalgia today - Valentine goodie bags decorated with apothecary jar motifs. Two ways to make them: with a cellophane window for a realistic jar effect, or as a simple printable with an apothecary pic on the front. Both are a cinch to make. You can make them up in quantity for parties.

The bag style is a demi-pillow box: arched flaps on the bottom, but with a top opening. There's a built-in handle to tie together at the top. The top is secured with a flap so the bag contents can't fall out.

Here are your downloads. Tut follows.
ValentineBagA.pdf
ValentineBagB.pdf
ValentineBagCellophane.pdf

Valentine Goodie Bag Tutorial
1 Print out your gift bags and cut out the basic shape. Score and fold the centre fold - use a small metal ruler and a fine-point embossing tool (a spent fine-point pen work well, too). Next, mark the side flap, butting the ruler against the long bag edge. 
2 Next, mark the top flap in the same way.
3 Fold the side flap inwards and crease with a bone folder.
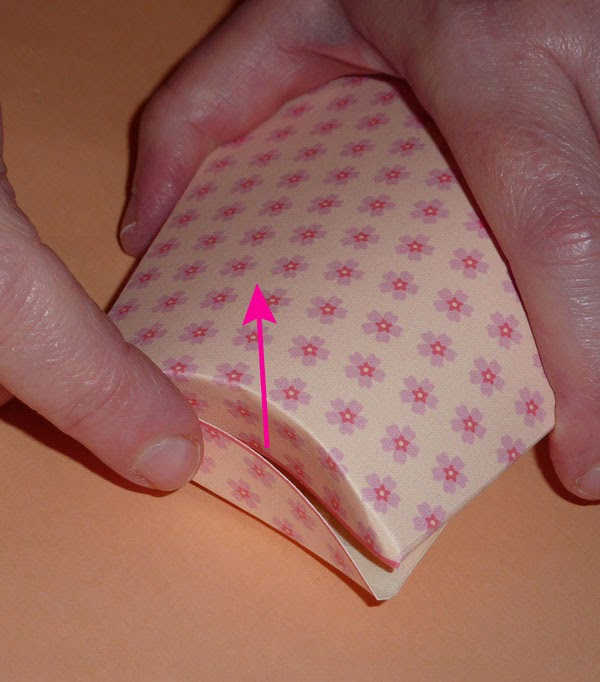
4 Now it is time to mark the curved lines of the pillow folds. Use the marquise-shaped template as your guide. The side with the sharpest curve faces upwards.
5 Make sure you mark the back curve in the same way! Fold gently along the scored lines when you are done.
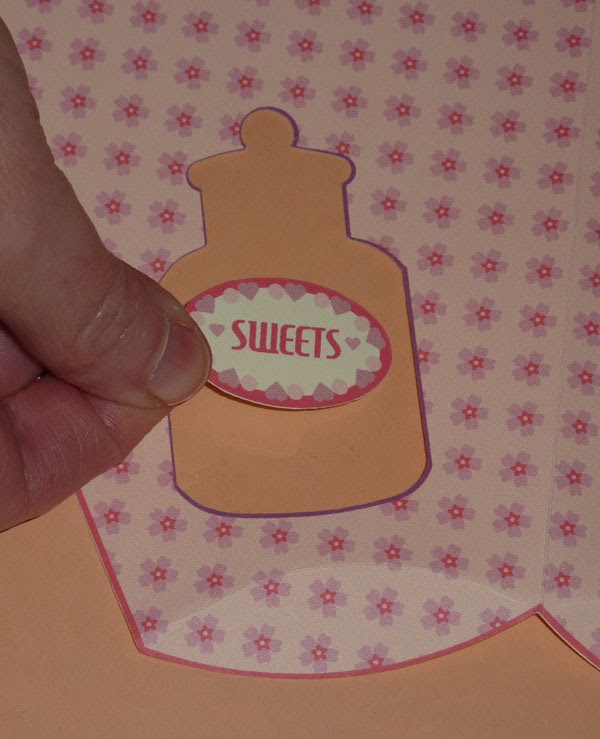
6 Above, the inside of the bag, folded and prepped. Cut a piece of cellophane just slightly larger all round than the cut-out - you can get several "windows" out of a cello card protector envelope. Go around the perimeter of the apothecary jar cut out with pieces of d/s tape. You also need a snippet of tape on the bottom front flap and under the top flap.
The tape for the long side flap belongs on the front side.
7 Smooth the cellophane in place over the cutout.
8 Stick the label on the centre front of the apothecary jar.
 9 Seal the long side flap. Align the edges carefully.
10 Seal the bottom flap.
11 Your sweetie bag is now finished. Add a bow to the top of the apothecary jar, fill the bag with sweet treats, seal the handle flap and tie a bow round the handle. You can add a gift tag, too.

I like to put the sweets in a clear cello bag inside the bag. That way, the gift bag can be recycled - and the sweets can be removed easily.

Of course, the bag styles without the window cutouts are even easier to make.

I have to admit, I hit the M&Ms while doing this post. Never had the ones with crispy rice inside before! Here, I'd like to share some:
Have a great Valentine's Day!