Saturday 5 April 2014

"Mini Muffin Tin" Tutorial

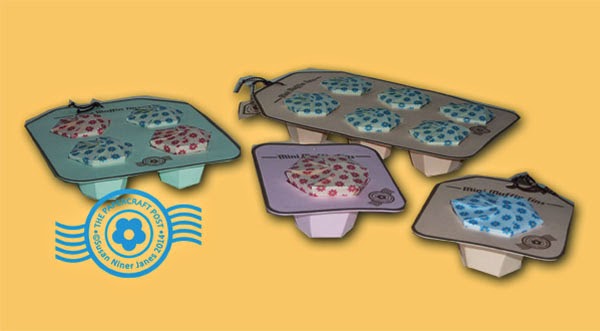
Choose from solo-, quad- or hex-compartment trays.
The tray above has lined compartments, rather than removable "muffins".
Today's project channels the home-baking trend. Since this is a papercraft project, these aren't real muffin tins - but they can be put to good use, nevertheless. Use the "muffin tins" as desktop organizers or as party favours for a baking-themed party (a yummy treat in each compartment!). Choose from one, four, or six compartments. I guess I could have called them "Cute Compartments" or "Pretty Party Organizers" - but Mini Muffin Tins it is.
As you can see above, the "muffin" container can be removed from its compartment. You can line the compartment for a "deluxe" version.

Here are your printables for all the variations:
MiniMuffinTinSixA 
MiniMuffinTinSixB.pdf
MiniMuffinTinQuadA.pdf
HexMuffinTinQuadB.pdf 
EggTray.pdf 
EggTrayCups&Liners.pdf 
MuffinCasesQuadSix.pdf 

MiniMuffinTinSoloA.pdf
MiniMuffinTinSoloB.pdf 
MiniMuffinSoloLinersA.pdf 
MiniMuffinTinSoloLinersB.pdf 

The Mini Muffin Tin solo is a larger size, so it requires a larger "muffin".
The smaller "muffins" fit the 4- and 6-compartment trays. For each size, you can choose from a rectangular or angled tray top. The Egg Tray has a plainer top end than the Muffin Tins (make it now and fill it with choc eggs).


Mini Muffin Tin Tutorial
1 For the purpose of the tut, a Mini Muffin Tin Solo will be made. The construction for the other styles is similar - only more compartments to be made. Above, parts cut out and prepped. I make the Mini Muffin Tins out of 160gsm copier cardstock.
2 Glue adjacent flaps to form a cup, like so:
Lining the cup with patterned paper is optional - but if you are going to do it, the time is now:

(Make sure the print faces inwards.)
3 Apply glue onto the cup tabs. Lower the top onto the tabs, aligning cup with the window opening: 
4 Next, apply the base cover, gluing around the edges and the hexagonal window. Smooth it in place. This is an optional step - the Mini Muffin Tin looks neater with the tabs concealed.


5 Next, make the Muffin from pretty print paper. Glue adjacent sides.
The muffin fits neatly in the tray compartment. To close the muffin top, fold down the sides consecutively in a clockwise direction, tucking the inner corner under where nececessary. (The outer corner is rounded, the inner corner is squared.)
Now you are done:
Add a tag, if desired.
A Mini Muffin Tin would make a gread brad, bead, or button stash - and/or suitable gift packaging for gifting to a crafty friend.


4 comments:

  1. Excellent tutorial Susan and a really different idea.

    ReplyDelete
  2. These are so cute. I can hardly wait to try and make one.

    ReplyDelete
  3. I loved this project so much I had to recreate a cutting file for it so I could use my Pazzles to cut it! I am not making the cutting file available for download since I didn't originate the idea but I did link your post in my post so people could come download the files you have offered if they would like to make the tins. Thanks so much for sharing!

    ReplyDelete
  4. Wow! Thanks for sharing all your hard work in creating this tutorial!

    ReplyDelete