Sunday 25 May 2014

Paper Patchwork Octo Box

An 8-sided paper patchwork box for you today - the last in my series of paper patchwork gift boxes and baskets. There's a patchwork block on each side of the box. On the lid, you have one whole block and four half blocks. It's a pretty big box - you could fit a cake inside (or lots of crafty goodies). 

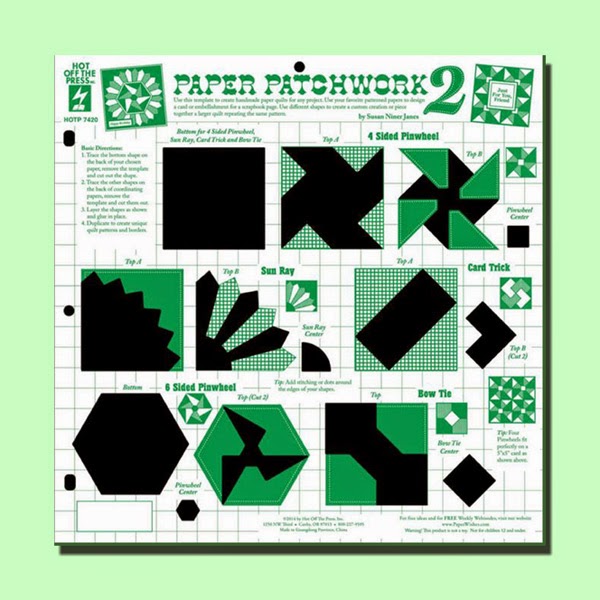
The patchwork blocks featured are all taken from my new HOTP Paper Patchwork 2 template:
You make up the 2-1/2in square layered patchwork blocks and glue them onto the box sides. Easy - and much quicker than you imagine.
The patchwork blocks make up in no time because they have a secret:
they are linked - and layered:
Enough of the pep talk, here's the Octo Box:
OctagonBoxLid.pdf
OctagonBoxSides.pdf

OctagonBoxLid.svg
OctagonBoxSides.svg


Paper Patchwork Octo Box

1 Cut out the box pieces: box lid and 8 sides, box base and eight sides. Score and crease the folds. Be careful not to mix up the box lid and base - they are of slightly different dimensions (the lid, must of course, be bigger than the base). Might be a good idea to make a small pencil mark on the wrong side of the lid. For a super-patchwork lid, you can cut the lid sides out of differently-coloured paper (little point doing this on the box base because the patchwork blocks conceal the cardstock underneath).

2 Cut out and make the patchwork blocks. You need eight for the box sides and three for the box lid (two of the same pattern - these are cut in half and surround the centre block).

3 Glue the patchwork blocks onto the box parts. Use tacky PVA glue.

4 Next, glue the lid sides onto the lid and the box sides onto the base.

5 To assemble the lid and box bottom, fold the sides up and glue the adjacent tabs. Then fold the flaps to the inside, gluing the edges in place. Your box is now finished.

For a luxurious finish, you can line and decorate the box lid and/or the box base. 

That concludes my paper patchwork container-making extravaganza. Check out all the other boxes and baskets that I have featured over the past blogweek. They are all serviceable containers in their own right, even if you don't choose to decorate them with paper patchwork.
Patchwork Block Gift BoxesPaper Patchwork Baskets
Paper Patchwork Rounded-Square Basket 
Paper Patchwork Big Square Box
Paper Patchwork Hex Box & Basket


Saturday 24 May 2014

Paper Patchwork: Hexagonal Containers

Two variations of one container shape today - choose from a hexagonal box or a pail with a linked handle. When I made the Rounded Square BasketI had to piece the handle because it was too big for the A4 cardstock. So - I've come up with a solution - a fun-to-link handle (you may have seen leather belts constructed in this way).

The patchwork blocks decorating the box are taken from my new HOTP template,  Paper Patchwork 2:
The flower basket motif on the pail is a freebie from me. Get it here:
QuiltBlocks.pdf 
And here are your Hex Box templates:
HexBoxLid.pdf
HexBoxSidesBase.pdf

HexBoxLid.svg 
HexBoxSidesBase.svg 


Hexagonal Paper Patchwork Box
1 Cut out the box pieces: box lid and six sides, box base and six sides. Score and crease the folds. Be careful not to mix up the box lid and base pieces, because they are of slightly different dimensions (the lid, of course, must be slightly larger than the box bottom in order to fit on top). It is a good idea to make a pencil mark inside the lid, to identify it. You can, of course, cut out the lid sides in different colours of cardstock to accentuate the patchwork effect (no point doing that for the box base, as the sides are mostly concealed with the patchwork blocks).

2 Cut out and make the patchwork blocks. You need six for the box sides, and one to decorate the lid. If you want to decorate the inside of the lid and box base, then you need two more! (Remember - the patchwork blocks are quick and easy to make because they are created by layering joined shapes - no teeny, tiny fiddle pieces.)

3 Score and fold the box lid and base pieces. Glue the patchwork blocks in place. Use tacky PVA glue applied with a cocktail stick. Here's how the box lid and base look with the blocks glued in place:
The right side of the box base faces the inside of the box .

4 To assemble the lid and box bottom, fold the sides up and glue the adjacent flaps. Then fold the top flaps to the inside and glue them down - you only need a thin line of glue along the inside bottom of each flap.
If you want, you can glue liners onto the box lid interior and outside the base to conceal the construction flaps (depends on whether you are are box-making perfectionist).

Hexagonal Paper Patchwork Pail

The pail is made in the same way as the hexagonal box bottom. The pail side pattern piece is slightly shorter because you don't need extra height on top to accommodate the box lid. Since the pail is open-topped, I always add a liner with a patchwork block decoration inside. You can decorate the bottom, too - it might be visible when you are carrying the pail:

The big diff is the fun-to-make linked handle. Here's how to do it:
1 Cut 18 links (9 blue gingham, 9 pink gingham) and two end tabs.

2 Fold each link in half widthwise, then open it out and fold the link lengthwise.
Lengthwise to pass through.
3 Insert the folded link through the triangular hole of the previous link. Once the link is through, open it out and re-fold the widthwise fold. This will require a bit of paper manipulation - bend the top of the previous link to enlarge the work space. You'll soon get the knack. Build up the chain, alternating link colours.
Back to horizontal-fold for linking.
4 Pass an end tab through the first and last links in the chain:
Punch an 1/8in hole on opposite sides of the pail (use a hand-held circle punch). Attach the handle to the pail with brads.

That concludes todays hex box project. We still have an Octo box to go in the Paper Patchwork Containers series. Stay tuned.

Don't forget to check out the Paper Patchwork Containers that have been Papercraft Post-ed earlier in the week:
PatchworkBlockGift Boxes
Paper Patchwork Baskets 
Rounded Square Baskets 
Big Square Box 

Have a fun and productive crafty weekend!


Friday 23 May 2014

Big Square Box: Paper Patchwork

Today's paper patchwork container is a Big Square Box. Not huge (about 5 x 3-1/4in/12.5 x 8.3cm) - but bigger than Monday's mini-cubes. Your basic square box comes in very handy - and provides a nice display area for the paper patchwork blocks. 

The patchwork block designs are from my new Paper Patchwork 2 template from Hot Off The Press:
HOTP papercraft template # 7420.
Of course, any 2-1/2in square patchwork block will fit onto the box sides and lid, including these:

QuiltBlockswStitching17May14.pdf

And here are your square box templates:
SquareBoxLid.pdf 
SquareBoxBaseSides.pdf 

SquareBoxLid.svg
SquareBoxBaseSides.svg 

The boxes are pieced so that the components fit onto photocopier-sized cardstock. You must cut a lid or a base and glue the sides all around, like so:
All the paper patchwork containers that I've made this week are constructed out of cheapo 160gsm photocopier cardstock which I have printed with a gingham pattern. The boxes are remarkably sturdy, because they are double-thick what with the layered patchwork blocks and the folded edges. And they don't look cheapo at all!

Big Square Box

1 Cut out the box pieces: box lid and four sides, box base and four sides. Score and crease the folds. Be careful not to mix up the box lid and the box base, because they are of slightly different dimensions. The box lid must, of course, be bigger than the box base in order to fit on top. (Might be a good idea to make a small pencil mark on the wrong side of the lid.)

2 Cut out and make the patchwork blocks. You need four for the box lid and eight to go around the box. Note how by rotating the position of the Sun Ray block (on the HOTP template), a circular pattern is created. Because the box bottom must be slightly smaller than the lid, you must very slightly overlap or trim one of the patchwork blocks on each box bottom side:
Just skootch it over a smidge when you glue it in place.

3 Next, glue the lid sides onto the lid and the box sides onto the base. Use tacky PVA glue. I use a cocktail stick as an applicator.
4 To assemble the lid and box bottom, fold the sides up and glue the adjacent tabs. Then fold the lengthwise flaps to the inside and glue them down - you only need to glue the bottom edges of the flaps.

Your Big Box is now finished. If you want to add a bit of stealth luxury (like the concept of a fur-lined raincoat), then you can add liners inside the box lid and box base. Decorate the liners with patchwork blocks - or simply use contrast cardstock. Nice surprise factor.

I read that ginghams are trendy this season -  not that they ever go out of style where patchwork is concerned. Here are some freebie printable papers for you. (Yes, I made them myself.):

NavyGingham.pdf
HotPinkGingham.pdf
PinkGinghamFlowers.pdf
Tip: if you want your printable papers to look like retro fabric that you just discovered in an attic chest, print them on cream-coloured cardstock. Antique-y, aged, tea-dyed!

Enjoy the holiday weekend. Happy patchwork papercrafting. 


Wednesday 21 May 2014

Paper Patchwork Basket: Rounded Square

Yesterday's paper patchwork baskets were a cinch - so I'm ramping things up just a little bit today. These rounded square basket shapes are very pleasing. They are not difficult to make - just make sure that you accurately position the sides when you glue them onto the basket base. It takes eight paper patchwork squares to make up the basket circumference.

The squares on these baskets are from my HOTP Paper Patchwork 2 template:
If you don't yet have the template, then any 2-1/2in paper patchwork block will fit (I gave you three in Monday's post).

Here are your basket files:
SquareBasketRoundedBaseF/B1of2.pdf
SquareBasketRoundedSidesHandle2of2.pdf

SquareBasketRoundedBaseFB1of2.svg 
SquareBasketRoundedSidesHandle2of2.svg 

The first template has the basket base and sides. You need to cut two side panels. The lines on the pattern pieces show how to position the paper patchwork blocks.

The second template has the side panels (which have holes for the basket brads) and the handle. The handle is cut in two pieces because it won't fit onto a page of copier paper.

Here's how to make the basket:

Rounded-Square Basket

1 Cut out two basket front/back pieces, two basket side pieces, two handle pieces, and one basket base from cardstock. Score the folds and crease them.

2 Make eight paper patchwork blocks in the designs of your choice. Glue them onto the basket front/back and side pieces. 

3 Referring to the placement markings on the pattern template, glue the bottom tabs of the basket front/back and side pieces onto the basket base, like so:

Tip: before you attach the front/back panels, "prime" them so that they curve gently - simply shape them over the side of your hand.

4 Fold the basket sides up, then join the adjacent sides, making sure that the short tabs are inside the basket. Next, stick the short tabs down in the corners. Use a strong PVA glue - like tacky glue to secure the joins firmly. You can cut another basket base piece to conceal the construction flaps if you like to keep things tidy.

5 Handle: overlap the join by 2in (5cm) and glue. Camouflage the join with a decorative piece of paper. Carefully pierce brad holes through the patchwork blocks on the two side panels. Attach the handle with brads on the inside of the basket. 

All finished now:
The baskets would make great gift presentation packaging for balls of yarn - or patchwork fabrics.

Remember - paper patchwork containers all this week on the blog. Moving on to big boxes next. Stay tuned.