Friday 30 January 2015

Valentine's Gift Basket

Another gift presentation idea today. Concept: the basket is part of the gift and can be kept as a storage container. These baskets look a bit like loaf pans. I've given you a choice of two different liners: scalloped or gently arched. There are three tag designs.
 
You don't have to use the pop-in liners. You can opt to incorporate translucent lining panels (vellum, or even tracing paper, works a treat), as shown above. (Remember to stick them down before assembling the basket sides.)
Here are your free printables:

No how-tos necessary - you'll figure it out. Just remember to score the folds. Tip: 6mm/1/4in d/s tape fits exactly onto the flaps - this speeds things up considerably.
 Note to self: don't snack on the props.

And now for something completely different:

Want to read about an inspirational book on an inspirational blog? My guest review of Jean-Claude Trebbi's The Art of Pop-Up is on The Make it in Design Blog :


Thursday 22 January 2015

Valentine's Gift Box

This pretty little gingham-and-lace gift box is quick and easy to make, and can be used for occasions all year round, besides Valentine's Day. 
They would also make cute storage containers for crafty bits and bobs.

The box features a new and improved version of the slot-close lid that I have used on other occasions. Previous incarnations were maybe just   just a little bit fiddly in the lid-removal department. Tah dah! Version 2.1 now has an attached handle, to make things that much easier. The lid is also creased along the handle line, supplying a bit of give which makes is easier to prise the lid off.

Here are your free printables:
Valentine'sGiftBoxHalf-MoonHandle.pdf 
Valentine'sGiftBoxRainbowHandle.pdf

Valentine'sGiftBoxRainbowHandle.pdf
Valentine'sGiftBoxRainbowHandle.svg

The templates are the same, the only diff being the shape of the lid handle.

No tut necessary for today's make, just a few making-up tips:
1) Score your fold lines before cutting out the pieces. I use a fine-tip embossing tool held against a small metal ruler to do the job. 
2) To make the lid, fold the handles. Apply tacky PVA glue to the underside of a handle and glue the two handle-portions of the lide together, with edges perfectly aligned. Next, apply glue to the underside of the handle piece and glue it onto the lid liner, wrong sides together and edges perfectly aligned. Smooth down.
3) I like to attach the gift tag through one of the slots. A snippet of craft thread does the job.

Now try this:
Graduated sizes are always fun - it's the Russian doll effect that appeals. The pic above shows boxes 20 percent smaller and twenty per cent bigger than the given size. If you like surprises, you can nest a 
teeny box inside a larger box.

Tuesday 20 January 2015

Celtic Calligraphy, by Kerry Richardson. Review.


Celtic Calligraphy

Calligraphy, Knotwork and Illumination

By Kerry Richardson

Search Press 2014

Hard-cover, spiral-bound; UK £12.99, US/CAN $24.95

ISBN 978-1-78221-001-6

Star rating: *****


A  frosty January is the ideal time to take on a new craft. Celtic Calligraphy is a thrifty candidate, since little more is needed than paper, pencil, and a selection of calligraphy felt-tips.  But it is the fascinating nature of the craft that is the main attraction.


I was charmed by Kerry Richardson’s Celtic Calligraphy book – it is like an evening class – or a wonderful workshop weekend. Clearly a labour of love, this book packs lots and lots of attractively-presented info within its 96 pages. The author’s voice is friendly and conversational. She is sharing the secrets of her beloved artform.


Not only (knot only!) do you learn how to write the beautiful Celtic Uncial letterforms, controlling the pen to create thick-and-thin lines, but you also learn how to draw continous braidwork borders, and decorative floral motifs - and put them all together to make an illuminated artwork: words and pictures.


This book is extremely user-friendly. The calligraphy is taught using felt-tips – so there is no pen-dipping beginner’s anxiety to tackle. The alphabet is taught pen-stroke by pen-stroke, with the usual numbered arrows.  A foolproof method (practice makes perfect). The Knotwork section is fascinating. It de-mystifies how to create complex-looking braided borders (easy when you know how).  There’s a section devoted to Knotwork Corners – a chance to go wild with ornate embellishments. The section on Colouring Knotwork is a revelation – you’ll learn tricks of the trade for turning 2D designs 3D (of special note – the Colouring with Feathering pages).  


When it comes to the illumination, those of us who cannot draw are often timid about creating decorative embellishments. Here, you will find step-by-step pics  showing how to draw a variety of floral embellishments: Bluebell, Sweet Violet, Wild Rose, Daffodil, plus fruit and foliage (oak and acorn, always a favourite).


The fantastical aspect of Celtic Calligraphy is a distinctive feature. At the back of the book you will find hybrid floral motifs – flowers with knotwork stems (love the Dandelion), and zoomorphic letterforms.


There are a couple of step-by-step projects at the back of the book to tie it all the acquired skills together, but the book’s strength is teaching the new skills (Celtic calligraphy, knotwork, and illumination) clearly, conscisely, and attractively. The spiral-bound format makes it very handy to keep a page open as you are learning.  A very giftable title (maybe to yourself).

Tuesday 13 January 2015

Washi Tape Gift Box

Give the gift of washi tape! Washi tape is an ideal, affordable gift for a papercrafting friend. With that thought in mind, I have abbreviated my Washi Tape Storage Box and come up with a mini version suitable for gifting. The box holds three rolls of tape - which should make a papercrafter you know extremely happy.

Here are your free printables:
WashiTapeGiftBox1of2.pdf
WashiTapeGiftBox2of2.pdf

WashiTapeGiftBox1of2.svg
WashiTapeGiftBox2of2.svg

For how-to on making the gift box, check out my previous Washi Tape Storage Box Tutorial

Of course, the mini gift boxes could be used to package other small surprises besides washi tape!


Sunday 11 January 2015

Washi Tape Storage Box - Washi Rolls!

Here's another version of my Washi Tape Storage Box (link to tutorial). I thought it would be fun to decorate the box with faux rolls of washi tape (I've always been a pushover for trompe l'oeil designs). 

Like my original Washi Tape Storage Box, I have designed boxes with and without a ribbon handle.

Here are your free printables:
WashiRollsStorageBox1of2.pdf 
WashiRollsStorageBox2of2.pdf 

WashiRollsStorageBox1of2.svg
WashiRollsStorageBox2of2.svg
I hope you make lots of lovely projects with your washi stash. Next post: stay tuned for Washi Rolls Gift Boxes. Washi tape is a lovely gift to give and receive!

Friday 9 January 2015

Washi Wonderful, by Jenny Doh. Review.


Washi  Wonderful

Creative projects & ideas for paper tape

By Jenny Doh

Lark Books 2014

Paperback, £14.99

ISBN 978-1-4547-0811-7


Star rating: ***1/2


Today’s smile-inducing title, Washi Wonderful, is certain to brighten up the bleak January days. Washi tape is such a mainstay of the papercrafter’s stash that it is hard to believe that it has only been around since 2006, the brainstorm of a group of talented Japanese designers. (I learned that fact from the capsule washi tape history at the front of the book.)


There are other washi tape craft titles on the market, but Washi Wonderful is a superior offering. The author, Jenny Doh, is a craft book veteran and enabler. She knows how to put a book together, creating a creative environment for a talented team of contributors to run with an idea, and also providing the crafter with the bigger picture about the subject at hand.


Washi Wonderful  includes a short history of washi tape, a very useful section on washi tape technique, a section on creative storage solutions (do you know a papercrafter who doesn’t hoard washi tape?), plus projects in the following categories: Cards, Gift Wrap, Party Décor, and Washi Fun (a catch-all section including 3-D and make-your-own). 


The pages on the Vellum method of working with washi tape are very useful.  Vellum, being translucent  like washi tape, is the ideal carrier medium. With it, 3-D translucent projects can be created. And, vellum can also be used as an aid when cutting or punching washi tape. 


Washi tape is such an appealing craft material, it is just about impossible for a washi project to look boring – but it is possible for washi projects to look same-y if the a “stick a strip on it” trap is fallen into. The great thing about this book is that it pushes the envelope – or roll of washi tape – when it comes to presenting project ideas. Most of the projects introduce dimensionality in some way – whether by including a contrasting texture or manipulating the washi tape. 
Example: the Thank You Card by Avital, in which the washi tape is applied as handwritten script (there’s added stitchery, too).  


Other appealing projects include the Stick Dolls by Ishta Olivera Belart, the Pinwheel Gift Ensemble by Cynthia Shaffer, the opulent Flower-Topped Gifts by Anne Stills (fantasy lotus shapes with rings of concentric patterned petals). Another winner is the D-I-Y washi tape, stencilled in an ikat effect, by Anne Stills. Two inventive projects by author Jenny Doh:  Fringes and Tassels (handy as giftwrap finishing touches) and the Arrow Gift Topper – a fun 3-D project that might come in handy for Valentine’s Day. The Sweet Treats sweet wraps by Carolyn Garris are oh-so-simple, and very appealing. The Origami Star Necklace effectively makes wishing stars out of washi tape to great effect.


All the projects in the book are easy to make.  It would have been nice to see more projects with torn-edge washi, as this is an appealing quality of the tape – but that is a small niggle about an otherwise imaginative and well-thought out title.


Note: I was provided with a review copy of this book


Need a place to put your washi stash? Try my free printable Washi Tape Storage Box.

Tuesday 6 January 2015

Washi Tape Storage Box Tutorial

The party's over. Time to look forward to new creative challenges. But first - get organized! Today's project: Washi Tape Storage Boxes. Each pretty print box holds approximately 10 rolls of washi tape. You can make the box in purple or pink, with- or without a ribbon handle (the ribbon-handled box reminds me of animal crackers).

Here are your free printables (tut follows):
WashiTapeBoxPink1of2.pdf 
WashiTapeBoxPink2of2.pdf 

WashiTapeBoxPurple1of2.pdf 
WashiTapeBoxPurple2of2.pdf 

WashiTapeBoxPink1of2.svg 
WashiTapeBoxPink2of2.svg 

WashiTapeBoxPurple1of2.svg 
WashiTapeBoxPurple2of2.svg 

Here's the tut:

Washi Tape Storage Box


1 Here are all the pieces, cut out and prepped. Score the folds with a fine-point embossing tool held against a small metal ruler. You need about 45cm/18in of ribbon if you are making the box with the handle. Double-sided tape is placed on the top side of the tabs, and also underneath the straight long edge. Glue the reinforcements over the holes for the handled version.
2 Attach the side panels to the base of the box between the tabs, on either side.
3 Pic above shows the side panels attached to the box body.
4 Next, attach the small tabs to the underside of the side panels. Attach the two at the box front first.
5 Turn under the front lining and smooth it in place. It is attached with a strip of d/s tape under the bottom edge.
6 Next, attach the two remaining short tabs to the underside of the side panels.
7 Pic above shows what the box should look like now. Note that the back of the lid has not been scored - this is so it will roll smoothly to close, and fit the contour of the washi tape rolls more precisely.
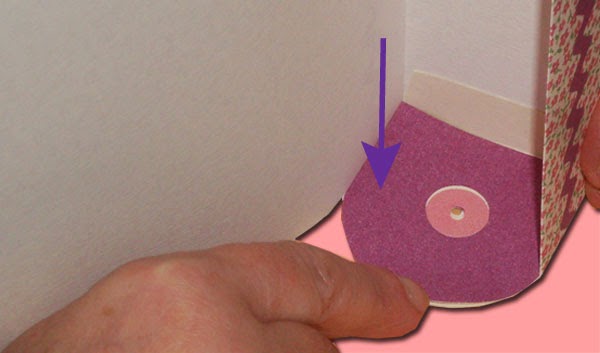
8 Stick the side liners onto the underside of the side panels. If making the handled version, make sure the holes align. Smooth the panels down and tamp the bottom corners down.
9 Use a tapestry needle to thread the ribbon ends through the holes.
Double or triple-knot the ribbon tails so they don't pass through the holes.

10 To close the box, roll the lid down and insert it under the front edge.
It is a good idea to prime the lid - shape it with your fingers - so that it curves gently. If you want a super-deluxe box, you can cut a piece of paper to line the base of the box.

So, that's it. Have fun organizing your washi stash! (If you accumulate more tape, just make more boxes!

More washi boxes here: Washi Tape Gift Box , Washi Rolls Washi Tape Storage Box  

Sunday 4 January 2015

The Art of Cutting, by Jean-Charles Trebbi. Book review.


The Art of Cutting

Tradition and new techniques for paper, cardboard,

wood, and other materials

Jean-Charles Trebbi

Promopress, 15 January 2015, paperback


Star rating: ****


Jean-Charles Trebbi is back with another inspirational design odyssey. The subject this time is – literally –  cutting-edge design. The book examines the many transformative techniques used to cut creative materials. The emphasis is on paper, but the book is interdisciplinary and looks at methods of cutting a range of materials including fabric, wood, metal, and plastic.


The author, an architect and designer, has retained a childlike sense of wonder about how things are crafted and assembled. He begins with a whirlwind world tour of cutting techniques. In the Cutting as Popular Art section, national traditions of cutting crafts including the following papercutting methods feature:  French canivet (paper lace, similar to Pergamano), janzhi (China), kirie (Japan), Scherensnitt  (Switzerland), wycinanki (Poland), and papel picado (Mexico). These folk arts are described, and you also see work by innovative practitioners such as Kathleen Trenchard, who creates updated papel picado featuring contemporary subject matter. 


The Cutting and Gastronomy section is a revelation. I was unfamiliar with Icelandic Laufabrauo (leaf bread), Christmas bread which is decorated with ornate lacé patterns. The Orange Art pages are a fun curiosity- a party trick with design credentials. Kind of like small-scale pumpkin-carving, this obscure craft involves cutting orange peel in intricate interlocking designs.


Most of the book has a Meet the Makers format, and is divided into sections according to material. The author looks in on designers who are driven by tradition, enabled by technology, and fuelled by creative ingenuity. They generously reveal their methods, observations, and motivations. Example: Sophie Milenovich, of Paris, notes that, “The most surprising thing when you study the different ways of making clothing is the inventiveness you find in communities that produce a three-dimensional object from a two-dimensional element.” She goes on to point out that Western clothes tend to be constructed of complex pattern pieces. The section on clothing shows an appreciation of the aesthetic appeal of the pattern pieces themselves, which are displayed as works of art in their own right. Sort of like the double-helix – if a design works, it is beautiful.


So – the book is an all-singing, all-dancing exploration of cutting-based form and function - the tools and techniques used to cut a variety of materials, plus examples of artisan-designed end products. 


If you are a papercraft geek, you may already know what slice-forms are.  Described by the author as “halfway between art and mathematics”, they are geometric shapes made of comblike pieces that interlock at right angles. Astonishingly, they fold flat. The Art of Cutting is very informative on slice-forms. I was fascinated to read that slice-forms were used by the famous Bauhaus School to teach 3-D design to its students in the 1920s (in the absence of computer imaging). Now slice-forms are designed on computer. And because of digital cutting technology, slice-form designs can be created as  functional items, such as furniture. 


This book contains 10 templates to cut out. My .pdf preview did not include these, but if they are similar in quality to the templates in The Art of Pop-Up, they won’t disappoint.


Taken with his other Promopress titles, The Art of Pop-Up, and The Art of Folding,(I’ve yet to feature the latter – I’m catching up – but I wanted you to know about The Art of Cutting, the newest title, right away), it looks like M. Trebbi is working towards a design theory of everything. I, for one, am hoping that the author will tackle 3D and 4D printing next. That would be a treat.