Here's a pretty, portable way to combat the heatwave. A dainty, lace-look paper fan in a compact pocket. Pop one into your purse and be prepared for stuffy train carriages and other hot spots. The fans are super-easy to make - and there's a choice of two colourways.
Here is your free printable project:
PurpleFan.pdf
PurpleCase.pdf
PurpleFan.svg
PurpleCase.svg
PinkFan.pdf
PinkCase.pdf
PinkFan.svg
PinkCase.svg
Fan-in-a-Case Tutorial
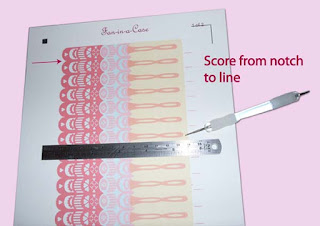
1 Print the fan. Score the folds from notch to line using a fine-point embossing tool held against a metal ruler.
2 Cut the fan out and crease the folds with a bone folder. Nice, sharp creases. Accordion the pleats.
3 The fans shown are made using 90gsm paper. That is too thick to staple - so you must punch holes to thread a ribbon tie through. Use a 1/8in circle handpunch. Punch the holes at the marked indentations of the fan handle, ash shown.
4 For each fan, you need 30cm (12in) of pleated ribbon. Thread the ribbon through the holes with a tapestry needle. Turn the fan to the back and tie the ribbon, cinching in the pleats. Turn ribbon back to the front. Thread each ribbon tie through the holes to the opposit side of the fan base. Finally, tie the ribbon tails into a bow. You can trim the tails at an angle and apply PVA glue to the ends to prevent fraying.
Note: If you print the fans onto thin photocopier paper, then you can opt to staple the fan together instead of punching holes and lacing.
5 Case: print the case, cut it out. Score the folds from corner to corner, as shown. Apply d/s tape to the flaps, as shown. Fold the flaps as shown above, then fold the case back down, with edges aligned. Pop the fan into the case. You're done!
The fan is light and compact - ideal to carry in your bag, or as a party favour - especially at weddings (could come in handy during the ceremony). Suggestion: make a fan and post it to a friend - fan mail!
Monday 29 June 2015
Sunday 21 June 2015
Summer Swirl Pinwheel/Windmill. Print and cut!
Summer solstice today - so I thought I'd post a breezy and fun summer project. Pinwheels/windmills - whatever you call them - are pure joy when they are whirling in the wind.
These pinwheels (this post is a transatlantic mash-up), are soo easy to make for two reasons: 1 I've provided you with print-and-cut templates. 2 They are constructed with the brilliant new pinwheel attachments kit from WRMK. The pinwheel attachment kits come with easy-assembly hardware and a choice of candy-stripe straw in six colours. Very affordable, too. What a great idea!
Here is your free printable pinwheel template:
Summer_Swirl_Pinwheel.pdf
Summer_Swirl_Pinwheel.svg
Summer Swirls Pinwheel/Windmill
Here's How:
1 Print the pinwheel on 160gsm photocopier card and cut it out. For each pinwheel you need two pinwheel sails and the flower, which conceals the pinwheel end cap. You also need the WRMK pinwheel attachments kit.
2 You can make up the pinwheel with sails in contrasting colours, or the same colours. Lay the sails on a flat surface, white side up. Interlace the sails, as shown in the picture above.
3 Push the centre spoke onto the main piece of the WRMK pinwheel attachment. Slip the inter-leaved pinwheel head onto the centre spoke.
4 Thread the arms of each pinwheel sail onto the centre spoke, as shown above. When all 8 arms are in place, push on the end cap. The flower is attached to the end cap with a bit of d/s tape.
If you prefer, you can make a simple pinwheel using only one of the sails.
Your pinwheel is finished and ready to go. Give it a spin - it twirls speedily and smoothly!
Making these pinwheels is so easy and fun, you'll want to make a windfarm!
Spin doctor: if you tie on a ribbon to flutter in the breeze, tie it onto pinwheel handle, clearing the pinwheel head, not the hardware. You don't want to prevent free-spinning.
Remember that pinwheels are made with small pieces and are unsuitable for children under 3.
These pinwheels (this post is a transatlantic mash-up), are soo easy to make for two reasons: 1 I've provided you with print-and-cut templates. 2 They are constructed with the brilliant new pinwheel attachments kit from WRMK. The pinwheel attachment kits come with easy-assembly hardware and a choice of candy-stripe straw in six colours. Very affordable, too. What a great idea!
Here is your free printable pinwheel template:
Summer_Swirl_Pinwheel.pdf
Summer_Swirl_Pinwheel.svg
Summer Swirls Pinwheel/Windmill
Here's How:
2 You can make up the pinwheel with sails in contrasting colours, or the same colours. Lay the sails on a flat surface, white side up. Interlace the sails, as shown in the picture above.
3 Push the centre spoke onto the main piece of the WRMK pinwheel attachment. Slip the inter-leaved pinwheel head onto the centre spoke.
4 Thread the arms of each pinwheel sail onto the centre spoke, as shown above. When all 8 arms are in place, push on the end cap. The flower is attached to the end cap with a bit of d/s tape.
If you prefer, you can make a simple pinwheel using only one of the sails.
Your pinwheel is finished and ready to go. Give it a spin - it twirls speedily and smoothly!
Making these pinwheels is so easy and fun, you'll want to make a windfarm!
Spin doctor: if you tie on a ribbon to flutter in the breeze, tie it onto pinwheel handle, clearing the pinwheel head, not the hardware. You don't want to prevent free-spinning.
Remember that pinwheels are made with small pieces and are unsuitable for children under 3.
Wednesday 10 June 2015
Origami Kit Giveaway
Ultimate Origami for Beginners
By Michael G. La Fosse & Richard L. Alexander
Tuttle Publishing 2014
Boxed kit includes: 64-page booklet, instructional DVD, 62
folding papers in three sizes: small squares, larger squares; mock dollars for
money-folding
Welcome to my first-ever blog giveaway. It’s a winner – a boxed origami kit by the
renowned origami duo, La Fosse and Alexander. Suitable for beginners or older
children, this paper-folding kit is a box of delights.
The beauty of this kit is that you can choose how to learn.
Are you a book person? Follow the trad step-by-step origami folding diagrams in
the booklet. Do you prefer video
instruction? Then watch the clear, no-nonsense video how-tos demonstated by
Michael G. La Fosse on the DVD. Or, use a combination of both to support your
learning.
The kit features 19 origami models in five different
categories – a really fun mix – Classic Favourites,
Flowers, Animals, Airplanes, and Dollar Folds. The projects include
modular designs – like the fascinating Crane’s
Egg – a three-section box and adorable animal models – such as the Dim Sum Bunny (cute as a dumpling!), a baby dinosaur, and Kanji the Dog (perky ears and
tail). There’s a money-fold Butterfly and a Yacht. No worries about the folding proportions of the bank notes
because the kit provides fake US dollar bills for your convenience.
You will really enjoy learning to fold an awesome variety of origami makes.
Giveaway details:
To enter, just leave a comment below by midnight, Wednesday,
17 June, 2015. Two lucky winners will be selected at random. UK entries only.
Good luck – and happy folding.
Postscript 3 July 15:
Congratulations to the giveaway winners, Jo Ives and Carol Saint. Happy folding!
Postscript 3 July 15:
Congratulations to the giveaway winners, Jo Ives and Carol Saint. Happy folding!
Friday 5 June 2015
I Love Paper, by Fideli Sundqvist. Review.
I Love Paper
Paper-cutting
techniques and templates for amazing toys, sculptures, props and costumes
By Fideli Sundquist
Quarry Books 2015
Paperback £14.99 UK,
£ 22.99 US, $24.99 CAN
ISBN 978-1-63159-02J-2
Star rating: *** 1/2
With a title and strapline like the above, this title was
destined to be featured on my blog. The author, Fideli Sundqvuist, is a Swedish
paper artiste extraordinaire. Her love affair with paper began as a child, when
she was introduced to the magic of Chinese papercuts. Since graduating from The
University College of Arts, Crafts, and Design (Konstfack) 2011, she has
undertaken commissions for clients in advertising and display, and has also
exhibited her work.
This is a template-led book with a good range of hand-cut
papercraft projects (40 in all), most of which are 3-D. Chapter headings
include Silhouettes, Geometric Figures, Food, Flowers and Leaves, Masquerade,
and Buildings – so lots of variety. The templates for making 3-D geometric
shapes could come in very handy for practitioners of Zentangle looking for surfaces
to decorate. There are plenty of pyramid boxes out there on the internet – but here
you will also find an icosahedron (20 sides). Easy when you know how – photocopiable
template provided. The paper animal zebra and lion template would delight any
child.
Paper flowers are ever-popular, and here you will find both
naturalistic and stylized versions. Step-by-steps are provided for the
projects. Since this book is translated from the Swedish, the text is occasionally
awkward. I think when “wax paper” is called for, it is tracing- or freezer
paper that is meant. But that is a small thing. You will find many important
asides and observations interspersed throughout – such as how important it is
to add dimensionality to a 2-D silhouette by giving it some lift to provide
shadowplay.
The paper food is beautifully done. Paper food is a Marmite
kind of thing. If you like it – it is done beautifully here. Lots of fancy cuts
and folds to appreciate. Paper sushi, anyone?
It is interesting to note that this artist does her original
sketches in the Illustrator drawing program – and then proceeds to hand-cut her
designs. Clearly the personal touch that hand-cutting provides is important to
the look of her projects. (It would have been the easy option to use a digital
papercutting machine.)
The photography is lovely. The projects are fun. But mostly –
this is one very talented artist’s
personal take on papercutting.
Subscribe to:
Posts (Atom)


